
In the lexicon of interior architecture, few materials possess the enduring versatility of the classic subway tile. Originally designed for the subterranean transit systems of the early 20th century, this humble ceramic rectangle has evolved into a premier tool for high-end wall curation. At Trendy Home Bloom, we view the subway tile not as a default choice, but as a flexible layout skeleton that can be manipulated to express your unique design perspective. Choosing how to arrange these tiles is a profound act of Spatial Intelligence, capable of introducing a sweeping Linear Rhythm or calming the optic nerve to facilitate a true Sensory Reset. By breaking free from predictable installation methods and exploring these 15 Subway Tile Patterns, you can completely eliminate “Visual Noise” and transform your bathroom walls into an Enveloped Sanctuary of light, texture, and quiet luxury.
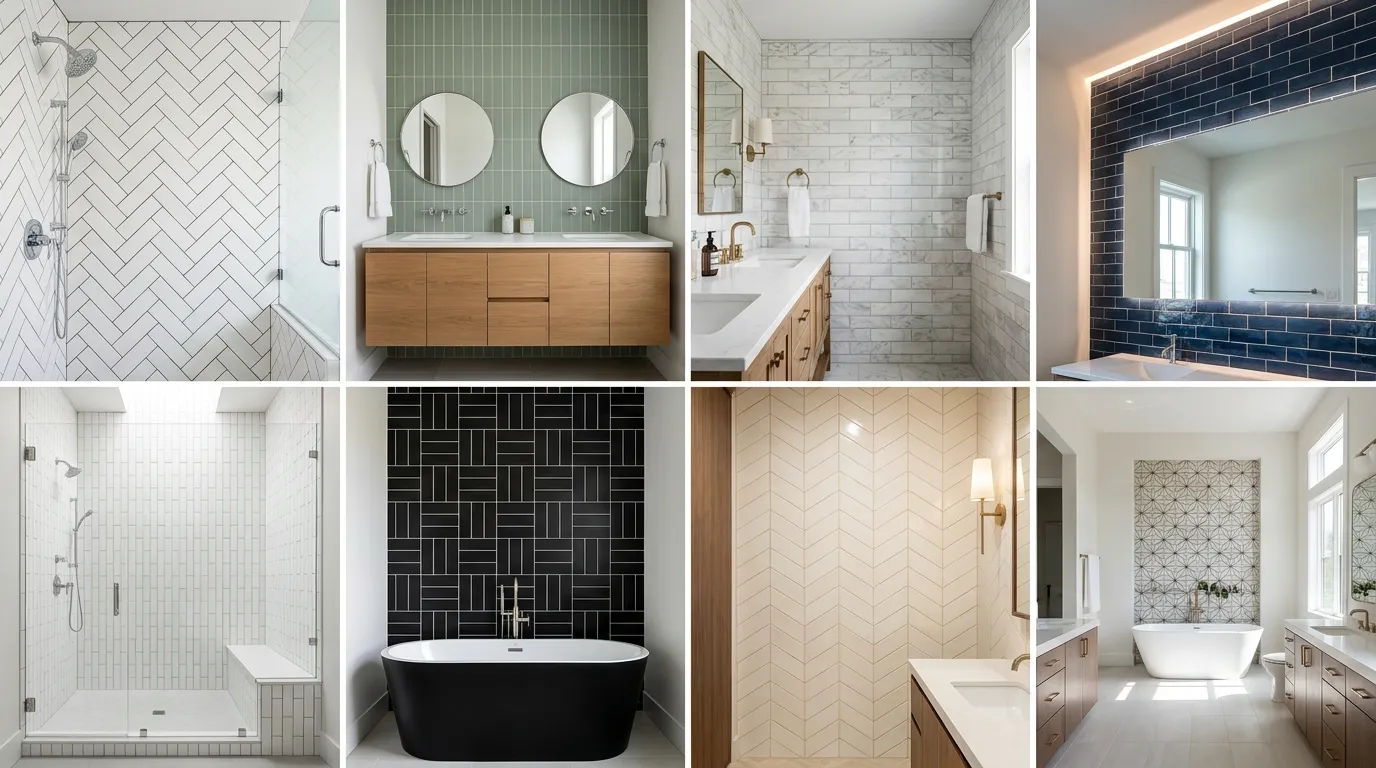
1. Traditional Horizontal Running Bond

The horizontal running bond remains an iconic foundational layout, celebrated for its historic charm and balanced geometry. By offsetting each row of tiles by exactly half the width of the tile below, you create a classic, brick-like grid that naturally steadies the eye. This layout provides an exceptional Pristine Canvas that allows your high-end plumbing fixtures and mirrors to act as striking pieces of jewelry. It is an ideal, low-stress configuration for grounding multi-functional spaces, mirroring the timeless structural logic we frequently implement across Luxury Bedroom Sanctuaries.
2. Modern Vertical Running Bond

Flipping the traditional running bond on its axis instantly updates the classic material into a contemporary statement. The vertical running bond guides the eye upward along the wall, maximizing the Visual Air of the room and making low ceilings feel dramatically taller. This pattern is a highly effective way to create a striking backdrop for your vanity or shower enclosure. The vertical alignment highlights the shifting heights of your space, delivering a clean and structured layout that feels highly customized and architecturally sharp.
3. Seamless Horizontal Stacked Grid

For purists who favor a minimalist, mid-century modern aesthetic, the horizontal stacked grid alignment is an exceptional choice. By lining up both the vertical and horizontal grout lines perfectly without any offset, you strip away the traditional brick look to reveal a clean, graphic pattern. This layout functions beautifully as a quiet backdrop, reducing background clutter so your freestanding tub or custom concrete vanity can shine. It brings a level of Minimalist Precision that pairs perfectly with sleek finishes and hidden storage solutions.
4. Structural Vertical Stacked Grid

The vertical stacked grid is a bold architectural choice that emphasizes clean lines and structural height. Aligning elongated tiles vertically in perfect columns creates a continuous, straight pattern that frames your walls like a work of art. This layout is a favorite in modern wet-rooms because it highlights the vertical shape of the shower zone while making the cleaning process simple. The resulting grid injects a unique Graphic Soul into the room, creating an upscale boutique hotel vibe.
5. Classic 45-Degree Herringbone

The traditional 45-degree herringbone layout represents the peak of movement and texture manipulation on walls. By interlocking the tiles at precise right angles to form a continuous V-shaped pattern, you create a dynamic surface that plays beautifully with changing natural light. This complex geometry breaks up the flat feel of standard drywall, introducing an unmistakable sense of luxury. Because this pattern draws significant visual attention, it functions best as a dedicated accent wall behind the vanity or inside a walk-in shower.
6. Contemporary 90-Degree Vertical Herringbone

A clever variation on the classic zigzag pattern is the 90-degree vertical herringbone, which aligns the stepped pattern straight up and down the wall. This minor geometric shift creates a modern look that feels both orderly and filled with energy. It delivers an intriguing Textural Dialogue across your bathroom walls, catching low evening light to cast beautiful, subtle shadows along the tile edges. This pattern is an excellent design option for creating a focal point in narrow spaces without overwhelming the room’s footprint.
7. Geometric Double Basketweave

The double basketweave pattern mimics the look of woven fabric by alternating pairs of horizontal and vertical tiles in a checkerboard layout. This intricate layout brings a touch of classic craftsmanship and artistry to your walls, making it an excellent choice for traditional or transitional homes. The repetitive blocks satisfy the brain’s desire for symmetry and order, helping to lower environmental stress. It acts as an exquisite ceramic tapestry that pairs beautifully with authentic wood vanities and natural stone elements.
8. Dynamic Diagonal Running Bond

If your design goals focus on making a compact floor plan look wider, the diagonal running bond is a clever option. By tilting the classic brick layout at a sharp 45-degree angle across the wall, you create an optical illusion that opens up the boundaries of the room. This layout challenges traditional grid boundaries, making small spaces feel breezy and expansive. This approach reflects the same focus on flow and expansion that we prioritize in Modern Living Room Layouts to maximize light.
9. Architectural Cross-Hatch Blocks

The cross-hatch layout takes the basketweave concept to a larger scale by grouping three or four tiles together into distinct square blocks before rotating the direction of the next cluster. This pattern looks exceptional when using elongated tiles, resulting in large geometric panels across your walls. The cross-hatch adds clear architectural weight and structure to the space, balancing the soft curves of round mirrors and oval sinks. It is a confident choice for homeowners who want their surfaces to make a strong, modern statement.
10. Rhythmic Three-Quarter Horizontal Offset

Moving away from the traditional half-tile offset, the three-quarter running bond shifts each row of tiles by just one-fourth of its length. This creates a sweeping, stepped pattern that flows across the wall like steps. This subtle change softens the rigid look of standard brick patterns, introducing a gentle visual motion that is naturally calming. It is a highly effective way to add character to simple white tiles without introducing chaotic color or distracting textures.
11. Elongated Vertical Third-Bond

The vertical third-bond pattern uses an offset where each tile starts one-third of the way up the adjacent tile, creating a stepped pattern that draws the eye upward. This layout looks best when utilizing extra-long tiles, creating thin columns of ceramic that accentuate the vertical scale of your bathroom. The asymmetry adds a sophisticated look to your walls, ensuring your shower enclosure feels like a private, custom-designed wellness retreat.
12. Alternating Linear Rows

To create an intriguing design without overcrowding your layout, try alternating rows of horizontal and vertical tiles. For example, installing one row of vertically stacked tiles followed by two rows of horizontal running bond creates an elegant pattern. This mix allows you to experiment with different shapes and lines, resulting in a custom look that shows off true design skill. It is an excellent way to connect different functional areas of the space into a unified design.
13. Horizontal Herringbone Block

In this pattern, the herringbone layout is turned so that the blocks run horizontally across the wall rather than vertically. This layout emphasizes the horizontal width of your room, making narrow bathrooms feel spacious and balanced. The horizontal alignment brings a relaxed feel to the walls, working beautifully in coastal or Scandinavian-inspired spaces that value bright light and open views.
14. Framed Border Niche Layout

Turn a functional shower niche into an architectural feature by changing the tile pattern inside the recess. Frame the perimeter of the niche with standard running bond, then switch the interior tile layout to a stacked vertical grid or herringbone pattern. This contrast creates a beautiful focal point on the wall while providing clear organization for your daily essentials. This design strategy mirrors the smart storage and display setups used to organize contemporary High-End Kitchens.
15. Monochromatic Color-Drenched Vertical Stack

Rounding out the elite spectrum of wall design is the technique of vertical stacking combined with monochromatic color drenching. By selecting a subway tile in a calming, nature-inspired tone – such as sage green, deep navy, or warm mushroom – and running it from floor to ceiling, you erase traditional wall boundaries. This constant color eliminates visual interruptions, creating an immersive space that feels peaceful and vast. This clean look allows your brass or matte black plumbing fixtures to stand out like high-end jewelry against a beautiful, unified backdrop.
- Actionable Pro-Tip for Wall Perfection: The secret to a truly professional subway tile installation lies in your grout selection and joint width. To emphasize the pattern’s shape and inject a Graphic Soul into the room, choose a grout color that slightly contrasts with your tile (e.g., soft grey grout with white tiles). However, if your goal is an understated look focused on texture, match your grout color exactly to the tile and specify a thin 1.5mm grout joint. This eliminates harsh grid lines and turns your tiles into a single, cohesive surface that catches the light beautifully.
Conclusion: Elevate the Visual Landscape
Designing your bathroom walls with subway tiles is an intentional choice to blend classic style with modern geometric layouts. Whether you decide to implement the expansive visual feel of the Modern Vertical Running Bond or choose the rich texture of a Classic 45-Degree Herringbone, your final choice should support your need for a daily Sensory Reset. By looking past standard layouts and thoughtfully playing with direction, scale, and grout contrast, you turn a simple wall surface into an executive-level retreat. Your home is the primary stage where your daily schedule and your private moments of personal recovery meet; ensure its closest surfaces are beautiful and intentional enough to let your peace of mind truly bloom. For more expert deep-dives into elevating every corner of your residence, check out our latest Trendy Home Bloom Blog posts.
FAQs
Q: Which subway tile pattern makes a small bathroom look bigger? A: The Modern Vertical Running Bond and the Structural Vertical Stacked Grid are the most effective patterns for expanding a small footprint. By aligning the long side of the tiles vertically, you pull the eyes upward toward the ceiling, creating an illusion of height and opening up the visual space. For narrow rooms, a Horizontal Herringbone pattern helps widen the visual horizon.
Q: What is the standard size for a subway tile, and does it matter? A: The traditional standard size for a subway tile is 3×6 inches. However, modern design has introduced elongated variations such as 2×8, 3×12, or 4×12 inches. Choosing an elongated tile reduces the number of grout lines on your wall, lowering visual noise and creating a sleek look that matches contemporary style.
Q: Do I need to seal the grout on my subway tile bathroom walls?A: Yes, sealing your grout is a critical step to protect your walls from moisture damage and stains. Standard cementitious grout is highly porous and can absorb water, soap scum, and oils over time. Applying a high-quality penetrating grout sealer immediately after installation – and reapplying it every 12 to 18 months – creates an invisible barrier that keeps your surfaces looking pristine.