
The bathroom vanity is the undisputed “Command Center” of your morning ritual. It is the architectural anchor that holds your daily essentials and sets the tone for your grooming experience. Over time, moisture and daily wear can turn a once-stunning vanity into a visual anchor that drags down the room’s energy. However, you don’t always need a full renovation to facilitate a “Sensory Reset.” At Trendy Home Bloom, we believe that the most rewarding part of home curation is the “DIY Bloom” taking a solid, existing frame and breathing new life into it through the art of color. Learning How to Paint a Bathroom Vanity is a high-reward skill that allows you to achieve a “Bespoke” look at a fraction of the cost of new cabinetry.
The secret to a professionally managed paint job lies in the “Preparation Ritual.” It is not about the speed of the brush; it is about the “Material Tension” between the surface and the coating. If you rush the prep, the finish will fail. But if you follow these pro-level steps, you will turn your clinical bathroom into a “Social Sanctuary” of peace and style.
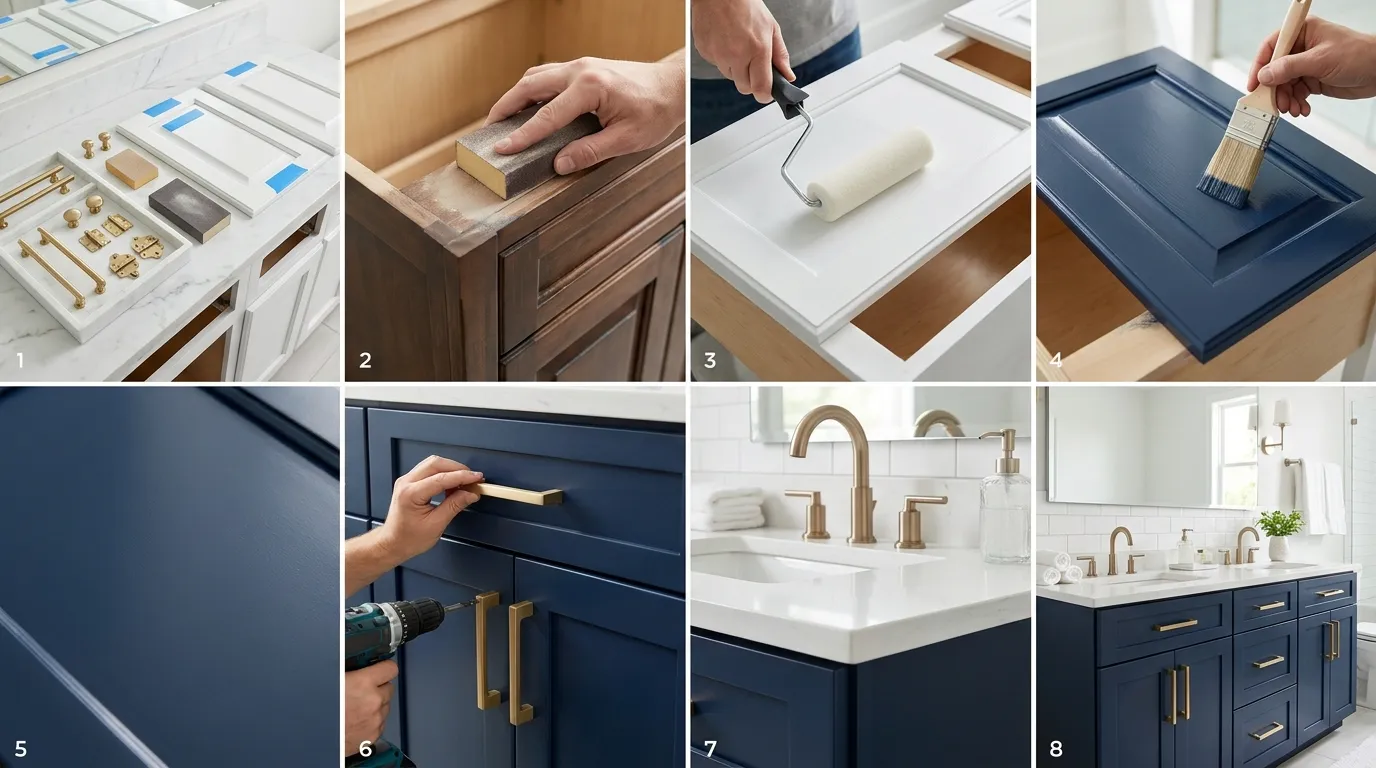
1. The Disassembly and Hardware Audit

Before you even touch a paintbrush, you must strip the vanity to its “Structural Bones.” Remove all doors, drawers, and – most importantly – the hardware. Trying to paint around hinges or handles is a “Designer Sin” that results in a messy, amateur finish. Label every screw and hinge in small bags so that reassembly is a “Frictionless” process later.
- The Jewelry Audit: Take this moment to look at your old handles. If they feel dated, consider upgrading to solid brass or matte black “Metallic Jewelry.”
- Safety Check: Remove the items from inside the vanity to avoid “Visual Clutter” and potential paint spills on your home essentials and organization tools.
- Environment Prep: Lay down heavy-duty drop cloths. A bathroom is a “Wet Zone” with tight corners, and you want to protect your floor tiles from “Specular Spatters.”
2. The Deep Degreasing Ritual

Bathrooms are hubs for hairspray, lotions, and soap scum – all of which are the enemies of paint adhesion. Use a powerful “TSP” (Trisodium Phosphate) solution or a high-end degreaser to scrub every square inch of the vanity. If there is even a microscopic layer of oil left on the surface, your “Color Bloom” will peel within months. This is about creating a “Clinical Canvas” that is ready for a permanent bond.
Pro Tip: Focus heavily on the areas around the handles and the base of the vanity. These are the “High-Touch Zones” where skin oils and moisture accumulate the most. Scrub until the water no longer “beads” on the surface.
3. The Tactile Leveling (Sanding)
")
You don’t need to strip the old finish to the bare wood, but you must “scuff” it to create a “Mechanical Grip.” Use a 120-grit sandpaper to break the “Gloss Horizon” of the original finish. Sanding creates tiny “valleys” in the material that allow the primer to anchor itself. This is where you manage the “Tactile Soul” of the furniture. Once sanded, use a “Tack Cloth” or a vacuum with a brush attachment to remove every speck of “Acoustic Dust.” Any dust left behind will create “Grit” in your final finish, ruining the “Silk-matte” luxury you are aiming for.
4. Priming: The Invisible Bond

In a high-moisture environment like a modern bathroom, the primer is your most important “Invisible Protection.” Use a high-adhesion, oil-based or shellac-based primer. These primers act as a “Stain Blocker,” preventing the natural tannins of the wood from bleeding through your new color.
- Why it matters: Primer is the bridge between the old soul of the wood and the new identity of the paint.
- Visual Check: If you are painting a dark vanity a light color, two thin coats of primer are better than one thick one.
- The “Pro” Sand: After the primer is dry, lightly sand it with 220-grit paper. This ensures the final paint sits on a “Seamless Horizon” of smoothness.
5. Choosing the “Moisture-Proof” Color Bloom

When selecting your paint, “Utility” must meet “Style.” Use a high-quality “Cabinet-Grade” enamel paint. These paints are designed to “level out,” meaning the brush marks disappear as the paint dries, leaving a factory-like finish. Much like the precision required in luxury kitchen cabinetry, your bathroom paint must be able to withstand “Hydro-Stress” and frequent cleaning.
- The Palette: Choose “Warm Neutrals” like Mushroom or Charcoal for a “Quiet Luxury” vibe.
- The Finish: A “Satin” or “Semi-Gloss” finish is best for bathrooms as it reflects light softly and is incredibly easy to wipe down.
- The Technique: Use a high-quality “Angled Sash” brush for the corners and a “Small Foam Roller” for the flat panels. This combination ensures a “Rhythmic Flow” of paint with zero streaks.
6. The “Patience” Phase (Curing)

The biggest mistake DIYers make is reassembling the vanity too early. Paint may feel “dry to the touch” in two hours, but it takes 7 to 14 days to fully “Cure” into an “Indestructible” shell. If you put the doors back on too soon, the paint will “block” (stick together) and peel off when you open the door. Give your sanctuary time to “bloom” properly. Keep the bathroom well-ventilated and avoid using the shower for at least 24 hours to prevent “Humidity Damage” to the fresh film.
7. Reassembly and Final “Jewelry”

Once the paint is rock-hard, it’s time for the “Bespoke Reveal.” Reattach your doors and drawers, ensuring the hinges are perfectly aligned for “Radial Balance.” This is when you add your new hardware. The “Tension” between a fresh matte-painted surface and a sparkling brass or gunmetal handle is the “Designer Sparkle” that completes the makeover.
Actionable Pro-Tips: The DIY Masterclass
- The “Leveling” Trick: If you see a drip, don’t try to brush it out while it’s semi-dry. Let it dry completely, sand it flat, and re-paint that small section.
- Hardware Template: If your new handles have different hole spacing than the old ones, use “Wood Filler” during the prep stage to plug the old holes and drill new ones before you prime.
- Back-Brushing: When using a roller, always “Back-Brush” (lightly go over the wet paint with a dry brush). This removes any “Orange Peel” texture and leaves a “Museum-Grade” smoothness.
Conclusion: The Satisfaction of the Bloom
Painting your bathroom vanity is a powerful act of “Architectural Rebirth.” It allows you to take control of your environment and turn a dated utility into a high-end “Sensory Reset” zone. By mastering the layers of “Degreasing,” “Sanding,” and “Enamel Application,” you facilitate a transformation that is as much about your internal peace as it is about the room’s aesthetic. Remember, a professionally managed DIY project is one where patience is the primary tool. For more deep-dives into making every corner of your home reflect your unique light, check out our latest Trendy Home Bloom Blog posts
FAQs (Google Snippet Optimized)
Q: What is the best paint for a bathroom vanity? A: The best paint is a “Water-borne Alkyd Enamel” or a specialized “Cabinet Paint.” These formulas offer the durability of oil-based paint with the easy cleanup of water-based ones. They are moisture-resistant and “Self-Leveling,” which is essential for achieving a “Seamless” and professional finish in a wet-room environment.
Q: Do I have to sand my vanity before painting? A: Yes, sanding is a non-negotiable step for a “Pro-Level” finish. You don’t need to remove the old paint entirely, but you must “Scuff” the surface with 120-grit sandpaper to create a “Mechanical Bond.” Without sanding, the new paint will have “Zero Grip” and will likely peel or chip within a few weeks of use.
Q: How long should I wait before using my bathroom after painting the vanity? A: You should wait at least 24 hours before using the shower or sink to prevent “Moisture Interference” with the drying paint. However, for the paint to become “Indestructible,” it needs a full 7 to 14 days to cure. Avoid scrubbing or using harsh chemicals on the surface during this “Curing Bloom” phase.